Wednesday, March 31, 2010

Matzoh Cake

Matzoh Cake with Sprinkles
(makes one layer cake)
For the Chocolate Frosting (needs to be made at least one day ahead)
4 oz bittersweet chocolate chopped
3/4 cups water
2 cups sugar
4 tablespoons cocoa powder
4 sticks unsalted margarine
2 tablespoons of vanilla extract (if you like you can add 2 tablespoons of rum extract too)
4 egg yolks
For Assembly
2 cups Manischewitz wine
Room temperature chocolate sauce from day before
10-12 wet Matzohs
Sprinkles for decoration
1. Melt the first 5 ingredients in a pot until dissolved. In a separate bowl whisk the vanilla and yolks together. Temper the egg mixture by pouring some of hot chocolate mixture into the yolks slowly. Then add the yolks back into the hot chocolate mixture.
2. Refridgerate over night and assemble the matzoh cake the next day.
3. Take chocolate sauce out of fridge and let it come to room temperature.
4.To assemble the cake wet a 10-12 matzohs with water and place underneath a clean kitchen towel so it stays moist. Place one matzoh on a plate and sprinkle it with Manischewitz wine using a spoon and then spread the chocolate sauce over the matzoh. Repeat this step until all layers are used. On the top layer spread chocolate sauce and sprinkles!

Tuesday, March 30, 2010

Mandel Broit with Almonds


Mandel Broit with Almonds
1 1/2 cup ground almonds
1 1/2 cup cake meal (you will need extra cake meal for dusting)
1 tablespoon baking powder
1 teaspoon of salt
4 large eggs
1 1/2 cups sugar
1/2 cup vegetable oil
1 teaspoon vanilla extract
1 tablespoon orange and lemon zest (can be omitted if you'd like)
1/2 cup mini chocolate chips (optional)
egg wash (1 egg and water)
Mix together cake meal, ground almonds, baking powder, and salt in a large bowl. In another bowl beat the eggs with sugar until pale yellow. Add oil and vanilla into the egg mixture and then add slowly into the dry ingredients. Fold all together. Dough will be very sticky, so add more cake meal until you are able to manage the dough with your hands. Sprinkle more cake meal on marble surface and form dough into 4 logs about 2 inches wide. Brush logs with egg wash and bake at 350 degrees for 40 minutes until golden brown. Cut logs into 1 inch slices when warm, let cool completely and enjoy!!
**If you want your mandel broit to be more crunchy you can bake the cookies again, after they are sliced, for another 20-30 minutes until edges are crisp. Then you will have more of a biscotti-like cookie.

Gefilte Fish

Gefilte Fish in the making....
Underneath all that fish skin, head, and bones is a lot of sliced onions and carrots.

Saturday, March 27, 2010

IMPORTANT: A CORRECTION TO THE PASSOVER MACAROONS HAS BEEN MADE!!!
I'm sorry I made a mistake. Make sure to buy the 14oz bag of coconut and the 5oz can of sweetened condensed milk!
Sorry for the confusion! Hope it's not too late!

Friday, March 26, 2010

Passover Brownies

I found this recipe printed out in my mom's Passover collection. I thought it sounded pretty good and I added 3 ingredients to the batter to make them even better!
1 cup NUTELLA,
2 tablespoons instant espresso powder
1 cup mini chocolate chips
In the photo above is the final product, and let me tell you they taste really yummy. They don't have the brownie texture you're probably used to and they can be a little crumbly but they're Passover Brownies so what can you expect?? My point exactly! And the kids will love them regardless!! ENJOY!

My Mama's Beets

This recipe is something my mom makes every week, usually for Shabbat dinner. It is usually served as a side salad, but I think they can be great on top of an arugula salad with some goat cheese and pine nutes, or even a sprinkling of pine nut brittle. This is a really simple recipe that any beginner can make to impress his or her guests anytime of the year!
Warning: Make sure you have some disposable gloves on hand, unless of course you want to dye your hands red!
My Mama's Beets (makes enough to fill up a 13 cup Glad plastic container)
15 red or yellow beets
1 1/2 cups canola oil (can use vegetable oil instead)
1 1/2 cup red wine vinegar
juice of 3 fresh lemons
Salt and Pepper to taste
1. Boil beets in a large pot filled with water, be sure water covers all the beets in the pot. Boil for about 2 hours on medium heat or until they are fork tender.
2. Put on your disposable gloves and rinse in the sink a few times, to get rid of some of the red dye. See photo below. (FYI that's my mama helping me peek some of the beets!)
3. With gloves on peel the skin off the beets, rinse under water, and place cleaned beets into a large bowl. The skin comes off very easily without a knife. All you need to do is squeeze gently around the beet and you will see the skin peels off.
4. Keeping the gloves on, slice each beet in half and then slice each half into thin slices and place in a large container.
5. To dress the beets combine oil, red wine vinegar, lemon juice, salt and pepper into a small bowl, mix together, and then pour into your container and place in the fridge to cool. Make sure that all the beets are covered in the dressing, this helps preserve the beets. (They will last a long time, up to two weeks in the fridge.) See photo below.

Thursday, March 25, 2010

My Safta's Charoset (My Grandma's Charoset)

About Charoset...(taken from Wikipedia)

Charoset, haroset, or charoses (Hebrew: חֲרֽוֹסֶת [ḥărōset]) is a sweet, dark-colored, chunky paste made of fruits and nuts served primarily during the Passover Seder. Its color and texture are meant to recall the mortar with which the Israelites bonded bricks when they were enslaved in Ancient Egypt. The word "charoset" comes from the Hebrew word cheres — חרס — "clay."

The charoset serves an ancillary function with maror on the Passover Seder Plate. Before eating the maror — in the present day generally horseradish or romaine lettuce — participants dip the maror into the charoset and then shake off the charoset before eating the maror. This action symbolises how hard the Israelites worked in Egypt, combining a food that brings tears to the eyes (the maror) with one that resembles the mortar used to build Egyptian cities and storehouses (the charoset).

Despite its symbolism, the charoset is a tasty concoction and is a favorite of children. During the Seder meal, it may be eaten liberally, often spread on matzah.

Growing up I never really liked charoset, I don't think I ate it. Never did....but now that I have an appreciation for food and all that jazz I have decided that I like the taste of it! And you guys know how much I love dates. So, my Safta, which means Grandma in Hebrew, has been making charoset for Passover like this for many years. I wanted to share the recipe with you all, I hope you enjoy it as much as my family does!

Safta's Charoset

(Makes 6 cups)

1 pound pitted dates

1 apple peeled and chopped into big chunks

1 1/2 cup walnuts

1 cup Manischewitz wine (if you are worried about the kids substitute grape juice, but I can't promise anything about the taste!)

1/3 cup agave nectar

1 tsp cinnamon

1. First you must soften the dates by placing them in a glass bowl and pouring boiling water over them. Let them sit in the water for about 10 minutes.
2. With a slotted spoon, fish out the dates and place them into the food processor along with the chopped apple, and walnuts. Process.
3. After blending for a few minutes, stop and scrape down the walls with a spatula. Add wine, cinnamon, and agave nectar and process until the mixture comes out smooth, see photo.
NOTE: If you feel it's needed you can feel free to add more dates, agave, cinnamon, apples, and walnuts. This recipe has always been done by taste, my safta's taste, and then my mom's taste, and now my taste! This is how I made it and I think it tastes pretty damn good!!! If you don't have the taste, follow the recipe and hopefully you'll enjoy it as much as my family does!

Wednesday, March 24, 2010

Green Tea & Banana Smoothie

Green Tea & Banana Smoothie
1 banana (100 calories)
1 scoop vanilla protein powder (110 calories)
1 cup skim milk (110 calories)
1/4 cup matcha green tea powder
2 Splenda packets
5-6 ice cubes
Blend all ingredients together in a blender and enjoy!
It's very refreshing and light, and with the added protein powder it's also a good start to your morning breakfast! Add a fat-free yogurt later in the morning and you're good to go!

Tuesday, March 23, 2010

Passover Travels

Hello fellow readers,
I wanted to let you know that I'll be in Miami for the holiday of Passover. I will definitely be posting some yummy Passover recipes for you guys this week and next, so stay tuned. I hope you'll find them helpful. To all you folks who are celebrating, Have a Happy Passover!
Best,
Elia

Susan Z's Lemony Cabbage Salad

Susan Z's Lemony Cabbage Salad
1 head of green cabbage chopped
1 can heart of palm drained and sliced
5 stalks scallions thinly sliced (both green and white parts)
juice of 2 lemons
1 cup light mayonnaise
salt and pepper to taste
*for a little added twist you can add 2 tablespoons dijon mustard to the dressing.
Mix the cabbage, scallions, and hearts of palm together in a large salad bowl. In another small bowl mix together the lemon juice, mayonnaise, salt, and pepper (and mustard if you desire). Whisk the dressing together well and pour onto the salad.
Notes:
This salad was something I tasted at my mom's friends house. I have no idea where she got the recipe from but it's now something me and my mom both make a lot! I added the twist of the dijon one day as a twist and it added some zing to the salad, so I think it's a good addition. When I had it the first time it was served as a side salad but I think it could be a great side salad at your Passover Seder this year. It holds up well in the fridge, so don't worry about leftovers. But if you are not going to be many people half the recipe. If not for Passover I think it would be a terrific replacement for boring coleslaw at a BBQ. Thanks Susan Z.!

Monday, March 22, 2010

Passover Macaroons

Easy Chocolate Chip Macaroons
1 can (5oz) sweetened condensed fat free milk
1 bag shredded coconut (14oz)
1 cup mini semi-sweet chocolate chips
Preheat oven to 350 degrees. Mix all ingredients together well. Grease baking sheet very generously, to prevent macaroons from sticking to the pan after baking. Using a ice cream scooper like the one pictured here, scoop the macaroon mixture onto the baking sheet. Place in the center of the oven and bake for about 15-20 minutes, until golden brown around top and edges.
I calculated that each macaroon has about 205 calories. This recipe made 19 macaroons, if you use the same size scoops that I used. If you make smaller macaroons, just take 3895 (that's the total calories for the macaroon mixture) and divide it by how many macaroons you actually made. This will give you the calorie count per macaroon.
If you are going to eat macaroons during Passover I would save them as an afternoon snack (eat only one) OR as part of your breakfast with a cup of coffee and a greek yogurt or some scrambled egg whites! Gotta get that morning protein in somewhere!

Friday, March 19, 2010

A Perfect Snack

Here's a picture of one of my favorite perfect snacks! 1 caramel rice cake (50 calories) and 1 chocolate rice cake (70 calories) spread with 1 tablespoon peanut butter (90 calories). A total of 210 calories. That truly is a perfect portion of a snack. I like to eat this in the afternoon between lunch and dinner. I would imagine you can also use the apple cinnamon flavored rice cakes, but since I don't like that flavor I've never tried it. Give this snack a try, I promise you'll surely love it!

Thursday, March 18, 2010

6 Things I Dislike Very Much

(As I think about them I'll add more to the list, but right now there's 6)

You see the thing about me and my cooking is that I never cook or bake foods I won't eat myself. And I would never dare serve anyone something I wouldn't eat either. So here's the list of foods you'll never find in my kitchen or on my table...

1. Anything containing Blue cheese! I just think its point blank disgusting. The thought that it's blue because of the growing mold makes me want to lift one side of my upper lip up in disgust. (I call this move the Elvis lip, you get the picture. It occurs a lot.)

2. Fennel, Black Licorice, and Tarragon. They all have a very similar taste to each other, one I dislike! Fennel is definitely more bearable to eat when roasted but any raw salads that have it, I won't eat. Period.

3. Cloves. I hate the flavor of cloves. It reminds me of the taste of batteries or metal. I'm not sure why I did this when I was little, maybe it was to like recharge the battery or something or test if the battery was bad, who knows! But I remember licking batteries, not like everyday of anything, but for some reason I did it, more than once. The taste of cloves reminds me of this gross memory from childhood. I won't even drink chai teas because most of them have cloves in it.

4. Sardines, Swordfish, and Herring. These are types of fish I won't eat, nor will I cook or prepare them.

5. Cream Cheese Icing. I just think its gross, I know most of you out there love red velvet cakes, but why can't they just have regular icing that doesn't contain cream cheese. Cream cheese is for your morning bagels not for icing!

6. Any sort of brains, tongue, liver, pate, etc. You know what I'm talking about, those delicacies from other countries. Again, when I think about these food I raise my upper lip in disgust.

Wednesday, March 17, 2010

Real Easy Tomato Sauce


Tomato Sauce with Butter and Onion
I saw this recipe on a blog called Rachel Eats. It originally was adapted from Marcella Hazan’s The essentials of classic Italian cooking. I adapted it a tad further, see recipe below.
Serves 4
  • 28oz tinned whole San Marzano tomatoes (used chopped tomatoes)
  • 5 tbsp unsalted butter
  • 1 medium-sized yellow onion cut in quarters
  • salt to taste
  • crushed red pepper to taste
  • 5-8 basil leaves julienned
Peel the onion and chop it in quarters.
Put the tomatoes, onion, and butter in a heavy based saucepan and put the pan on a modest flame.
Allow the sauce to reach to a gentle simmer, adjust flame if necessary so the sauce cooks at a slow but steady simmer for 45 minutes. You need to stir every now and then, gently squashing and crushing the tomatoes against the side of the pan with a wooden spoon. (I didn't have to do this step because I used crushed tomatoes. The original recipe says to discard the onion after the sauce is cooked but I left it in for extra flavor!)
Add salt, crushed red pepper, and basil and cook for another 5 minutes. Remove from heat and use on your favorite pasta dish.
I imagine this would be great for a pizza sauce, an eggplant parmesan recipe, etc. The ideas are endless!

Tuesday, March 16, 2010

Burrito Bites

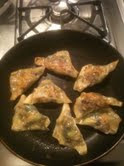
All you need is wonton wrappers and the ingredients from my Laughing Planet Burritos. Mix all the ingredients together in a bowl, make sure they are not warm. Next spoon filling into the center of each wonton wrapper. Make a triangle shape and seal the sides using water. This process takes some time, but the end result is worth it! These Burrito Bites would be great for a finger food party or even a snack for children!

To cook the Burrito Bites I first sprayed a pan with olive oil or non stick spray. Then place about 6-8 wontons in the pan and let cook on one side for a minute of two. Flip the wontons to the other side. Now take some water and pour a little in the pan to steam the wontons. Be sure to cover the pan so you don't get splattered with hot water and oil!!! After about 3 minutes the wontons are done. Enjoy them with some of your favorite salsa!

Monday, March 15, 2010

Burritos & Me Circa 2003

This is me with all the burritos form Laughing Planet that I brought back from Bloomington, Indiana after Homecoming 2003! Could you tell, I'm obsessed?????!!!! Thanks Jill for capturing this great memory!

Laughing Planet Style Burritos

I went to college at Indiana University of Bloomington. During my years in Bloomington I discovered one of the best burrito restaurants I ever ate. I don't think I even ate burritos before this time. Everything was organic and freshly made to order. The restaurant is called the Laughing Planet Cafe. I would eat there at least twice a week. What I loved about the burrito was that it had brown rice rather than spanish rice inside. I don't like spanish rice in my burritos. When I graduated from IU, I was very sad to leave Laughing Planet burritos behind, but luckily I got to go back for homecoming the following year!
When I did come back the year after graduating I told my friends that I was going to find a way to bring some burritos back to NYC. There was no way that I would leave Bloomington without a burrito or 2 or 10! I actually did bring back 10 burritos. I carried them in a lunch box and even got stopped at airport security with them. They asked me to see what was inside and I have to say I was pretty embarrassed. One of my friends does have a picture of this day, however, I need to get it scanned to my computer. (If any of you have it, please send it my way!)
So the burritos and I got back to NYC safely and from that day on for lunch or dinner I ate one of the burritos. They were delicious still! Last year I had the chance to go back to Bloomington once more for my friend's bachelorette party and of course we had a meal at Laughing Planet. I got the black bean and spinach burrito! Ohhhhh did I miss it!
There just isn't a place in NYC that is like Laughing Planet, at least none that I have found. I like to be able to hold my burritos without my hands getting dirty, like brown rice and fresh ingredients in them too! I used to like Burritoville that was the closest I ever got but then the one on the upper east side closed down! If you know of any good burritos in NYC please leave me a comment. Until then I will be eating my own version, that comes pretty darn close to Laughing Planet. The calorie count for my burrito was a total of about 515 calories and 22 grams of protein! That's a great lunch or dinner option! Here's my version...
The Ingredients: 1/2 cup brown rice, 1/4 cup mexican cheese blend, 1/4 of an avocado, 1 wheat wrap, sauteed spinach with Pam Spray, 1/2 cup black beans, and salsa (as much as you like)
All the ingredients for the filling was already warm when placed in the wrap (spinach, beans, and rice). The burrito after I folded it like a fool. The problem was that my wrap was to small and my fillings were too much for the wrap I used. It didn't really matter though because I was careful when I flipped it in the pan, so nothing came out. See photo. The key is to keep it together in the pan to get crunchy, if you can succeed doing that then you will be golden!
After both sides were crunchy and the filling was warmed through I wrapped the whole burrito with aluminum foil. I tried to get it nice and tight in the foil so that it wouldn't fall apart as I ate it.
I have to say that usually I'd want a side of guacamole to eat it with, but putting the avocado inside the burrito saved me a step and actually tasted wonderful! I liked how it got all warm and mushy, avocado in each bite!

Friday, March 12, 2010

Quinoa

I saw this recipe on Food Network on Saturday morning. I thought about what I had in my pantry and remembered I had some quinoa that I bought not too long ago. The cooking process is similar to that of rice, so I figured it's probably a good substitute. I also had some broccoli in the fridge and thought it would be a good addition. I omitted the scallions, but I suppose you can use them if you have them on hand. Into the cooking water I added about 4 tablespoons soy sauce to give the quinoa an Asiany flavor. Here's a guide to cooking quinoa, if you've never done it before.
My version came out ok, but the broccoli was overcooked because I added it in the beginning, oh well, my bad! The guide says to cook the quinoa for 15 minutes, I would put in the edamame and broccoli after the quinoa has been cooking about 12 minutes. When the timer goes off after 15 minutes remove the pan from the heat and let sit for 5 more minutes with lid on. Flake with a fork and eat up!
To be honest, I think I'll never make quinoa again. I really rather eat rice, besides the protein factor of quinoa, rice, brown or white, is just a whole lot tastier!
What do you think??

Thursday, March 11, 2010

My familia gets together

The flank steak that was marinated in olive oil, salt, and pepper for over 24 hours. It was deeelisshh!
My bro cooking up some potatoes with garlic and parsley, par-boiled first and then roasted in the oven til crisp! Also delish.
My meal. The steak and potatoes were adapted recipes from David Tanis' cookbook, A Platter of Figs and Other Recipes.
The salad was simple, just some mixed greens and shredded carrots. The dressing was olive oil, lemon juice, a pinch of sugar, rice wine vinegar, and salt and pepper.
This is my brother's cat, Grizette. I'm allergic to her and she gave me hives. Not a pleasure at all during dinner, but being with the family was worth all the suffering. Thanks Grizette!
From left to right, dad, mom, other brother, and my cousin from Israel on my dad's side...can't you tell??
My gorgeous sister in law.
My mom and brother with the gorgeous coconut cake I made.
We ate half of it. When I got back to my apartment I served 2 slices to my doormen, they were both extremely impressed and very thankful. And the rest I'm bringing to school, in my cool cake carry case, for my colleagues.

Wednesday, March 10, 2010

7 minute frosting is not easy...

So I get home this afternoon from work and am really excited to get busy making my cocount layer cake for the anniversary/birthday party dinner tonight at my brothers apartment...well let me tell you, this stuff ain't easy. I do not recommend beginner bakers to attempt this recipe. WARNING: DIFFICULTY LEVEL is HIGH!
So as it was I decided to make my life a little simpler by using a store bought white cake mix, that went great, easy peasy! I did that last night. I followed the Everyday Baking recipe, linked above. I started by placing all the ingredients into a heatproof bowl over a simmering pan of water, like they told me. I started beating and timed 7 minutes, like they told me to do. So the egg whites were cooking and getting nice and white, which is supposed to happen. When the 7 minutes were up the peaks were still not stiff, UH OH! I continued to beat the mixture for another 10 minutes, still no peaks, not even soft one! WTF!?!?! I was really frustrated at this point. I figured, you know what, let's try it again, maybe I did it wrong. Ahhh, here goes trial #2...
So again, I put all the ingredients in the heatproof bowl and start blending away, after 7 minutes no freaking stiff peaks, let alone soft peaks. I take a deep breath and continue to beat. Meanwhile my kitchen looks like a dynamite hit it, there are white specks of icing all over my stovetop and surrounding walls. Of course I wasn't wearing an apron and my jeans were all speckled white too! Great! So now my kitchen and I are all dirty and I still have NO PEAKS!
So I quickly google how to make egg white frosting, just to see if there are any other recipes that are somewhat similar to what I was trying to make, and they all basically were the same. So now I had to really think. I started to think rrrrrrrreeeeeaaaaalllllllllllll hard. I looked in the fridge to see if I had more eggs, cause I just wasted 6 whole eggs in the process. Luckily I did have just enough for one more batch, trial #3. They say three times a charm, right? Well, at least no one can say I didn't try...here goes nothing...
I decided to omit the corn syrup completely and cut down the sugar to a cup (the other two batters were too sweet anyway and I was running out of sugar). I also cut down the amount of water from 1/3 to 1/4 of a cup. I put 2 teaspoons of cream of tartar instead of a 1/2 teaspoon, because I know that cream of tartar is supposed to make things thick, so I didn't think it could hurt this time around. Below is the recipe, adapted from Everyday Baking's recipe, that I used for trial #3, and you know what...IT ACTUALLY WORKED AND STILL TASTED DELICIOUS!
Seven-Minute Frosting, My Way
3 large egg whites
2 teaspoons cream of tartar
1/4 cup cold water
1 cup sugar
1. In a medium saucepan, bring 2 inches of water to a simmer.
2. In a large heatproof mixing bowl, combine egg whites, cream of tartar, water, and sugar.
3. Place bowl over simmering water (it should not touch water); with a handheld mixer, beat on high speed until stiff peaks form, about 7-10 minutes.
4. Remove bowl from heat; beat 3 to 5 minutes more to cool. Use immediately
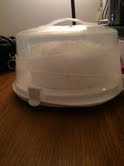
This is the cool cake carrier I got yesterday at Bed Bath & Beyond. No one is touching this cake until it's time for dessert.

Tuesday, March 9, 2010

Stop following me Chicken Pot Pie

So just to re-visit....I reheated the pot pies that I froze from last week, and they were even better than the fresh ones. I'm seriously in love with a good pot pie.
Dear Food Network,
Thanks for giving me the idea of even making a chicken pot pie. It's really a great delicious meal to have and it's easy to make! Now that I know what I've been missing all these years, it's time to stop haunting me. I mean, today I saw a variation of pot pie on Rachael Ray's and Ina Garten, i believe it's been on other shows this week too! It's getting out of hand so please, please, please stop with the pot pies! Anyways spring time is nearing and i'll be out with the old and in with the new, get with it!
Sincerely,
Your#1 fan

An Elia Pancake

Regular Oatmeal with 2 egg whites, 2 Splenda, and 1 mashed banana.
The Elia Pancake after the flip, see how brown it is???
Voila! The final product that was so enjoyed by me!
I started making these pancakes, now dubbed the "Elia pancake," when I was in Aruba over winter break. They are super healthy and low in calories and ridiculously easy.
Here's what you need to make Elia Pancakes:
1 package of instant oatmeal (any flavor, I use regular flavor and add 2 splenda, total of 100 calories)
2 egg whites (about 40 calories, 6 grams of protein)
*(A Large egg can be substituted for the 2 egg whites, that's 70 calories and 7 grams of protein.)
Mix together in a bowl, spray a small pan with Pam spray, and pour batter in. Let cook on each side for about 2-3 minutes till golden brown. Put on a plate and enjoy plain (since you put the splenda in it, it's already sweet) or with syrup, agave nectar, or I sometimes eat it with peanut butter. Make sure to measure out the peanut butter, I think 1 tablespoon is the perfect amount (90 calories).
So to recap, this whole breakfast is just 220 calories, if you do it my way. I tried adding a mashed banana into the batter and it was even more yummy than the plain one (total calories would be 320)! This breakfast leaves you with another 100-200 calories for a mid-morning snack at like around 10 or 11am. This is when I'll eat a fruit or a greek yogurt to boost up the protein count for breakfast. If you put a banana in the pancake don't eat another fruit for your mid-morning snack, stick with the yogurt!
The only negative thing is that these pancakes are best eaten right off the pan. You can make them ahead and keep in the fridge for a couple of days. I have tried reheating in the microwave and they are fine, just not as soft as they were when they were fresh. The same issue arises when you toast them. So stick to eating them fresh, they literally take 5-8 minutes to prepare and make!