Showing posts with label Chicken. Show all posts

Saturday, May 14, 2011

Asian Coleslaw Chicken Salad


Here’s Karen’s recipe that  I promised I’d post…enjoy this fiber filled recipe!!
This is a great quick lunch or dinner recipe that is healthy and tasty. You can serve it with grilled chicken on top or turn it into a vegetarian salad. I love to make this in the summer and if you don’t put the dressing on, it can last in the fridge all week without going bad. In case you weren’t aware, cabbage is high in fiber, vitamin C, potassium, and iron. It’s also low in calories so it’s ideal for anyone looking to lose weight. Fill up on cabbage this summer—you can even make it with a honey mustard, balsamic, or lemon dressing. Let us know what your favorite way to eat cabbage is!
Asian Coleslaw Chicken Salad
(serves 5)
1 pound chicken breast, thinly sliced
2.5 cups thinly sliced green cabbage
1 cup thinly sliced red cabbage
1 cup shredded napa cabbage
1 red bell pepper, thinly sliced
1 carrot, julienned
3 green onions, chopped
¼ cup chopped fresh cilantro

For the dressing:
3 tbsp rice vinegar
3 tbsp vegetable oil
2 tbsp creamy peanut butter
2 tbsp low sodium soy sauce
2 tbsp light brown sugar
1 tbsp minced fresh ginger root
½ tbsp minced garlic
Spray a pan with nonstick cooking spray. Grill the chicken 6-8 minutes on each side, remove from heat and set aside.  In a medium bowl, whisk together all the salad dressing ingredients. Set aside. In a large bowl, mix together all the salad ingredients.  Add in the chicken. Toss with the peanut butter dressing just before serving.
Nutrition Content:  322 Calories  15g Fat 2.1g Sat Fat 17.74g Carbohydrates 3.44g Fiber  39.8g Protein  623mg Potassium  322mg Sodium
-Karen Moreno, RD,CDN

Tuesday, November 2, 2010

Standing Chicken

Standing chicken is what I call this.  It's something my family loves!!  All you need to have to make this recipe is a vertical chicken roaster.  I bought mine over the weekend at Sur La Table.  It's not expensive and it will make cooking chicken super easy and not scary!!  This is the first time I ever handled a full chicken.  It was super easy.  You don't have to mess with it at all, just stick it on the roaster and that's it!
Place your vertical chicken roaster in a deep pan.  Pour kosher salt all around the vertical roaster, as shown, about 1/4 inch deep.  Spray the vertical raoster with non-stick cooking spray.
Place the chicken, legs down, onto the vertical roaster. Place in the oven at 400 degrees, cook for about  1 hour and 15 minutes.
This is what it looks like when it's in the oven.  I had to place my rack all the way to the bottom and remove all the other ones.
When you take it out of the over, let it sit for about 15 minutes, tent the chick with aluminum foil to keep warm.  You see all the gross chicken fat that dripped into the bottom??  YUCK!
 Now start carving.  It's not easy if you don't have a good pair of kitchen sheers or a good carving knife!  
The chicken comes out juicy, tender, and delicious.  And it's full of flavor from the salt that it was standing on. Not sure how it all works, but trust me it's amazing!  I made two chickens and ate one and saved the other for making chicken pot pie!!  Yummy!!

Friday, October 1, 2010

Korean Chicken Meatballs

Korean Chicken Meatballs
(makes about 15 meatballs)

2 tablespoons brown sugar
2 teaspoons sesame oil
8 garlic cloves
3 scallions
1 tablespoon chopped ginger
1 cup cilantro
2 tablespoons low sodium soy sauce
1/4 teaspoon salt
1 pound skinless chicken breast, cut into chunks (or ground chicken)
1/2 cup panko or plain breadcrumbs

Preheat oven to 400 degrees.
In a food processor, combine  sugar, oil, garlic, scallions, ginger, cilantro, soy sauce, and salt.  Process until finely ground.  Add chicken, and process until finely ground.  Transfer mixture into a bowl and add the panko and mix to combine.  Divide mixture into 15 portions and shape each into a meatball.  Place balls on a greased cookie sheet.  Bake for 15-20 minutes.

Saturday, July 31, 2010

Picnic in the Park

Yesterday was such a gorgeous day, it was perfect for a nice little picnic in the park!  Of course I made us something delicious to eat!  I made us some roasted eggplant and white bean spread with some Stacy's Pita Chips for dipping!  And then I threw together a very yummy hearty sandwich with grilled chicken, arugula, tomato slices, mashed avocado, and spicy light mayo served on a whole wheat baguette!  Doesn't that sound amazing??  I think so (and so did my friends)!

What's your favorite picnic sandwich???

Tuesday, June 22, 2010

Spinach Artichoke Chicken Burgers

Spinach Artichoke Chicken Burgers
2 pounds ground white meat chicken
1 box frozen spinach, defrosted with the water squeezed out (use cheese cloth)
1 can artichokes in water, drained well
salt and pepper to taste
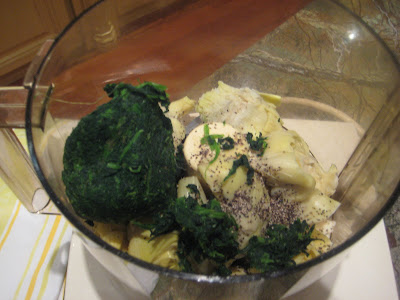
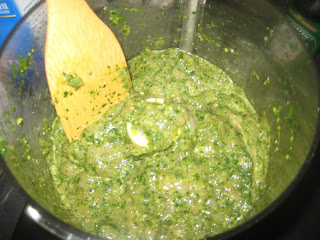
Place drained spinach and artichokes in a food processor and process until ingredients are chopped finely. Add chicken, salt, and pepper, and spinach artichoke mixture into a bowl until well combined. Make mixture into about 10-12 patties and grill on the BBQ! Serve on a toasted potato bun with caramalized onions and roasted red pepper aioli sauce, ENJOY!!
NOTE: To know if you have enough flavor (salt and pepper) in the burgers, make a mini tests burger on a pan and taste, adjust accordingly.
After cooking they looked like this...
Even the Dubie dog enjoyed!!

Thursday, June 17, 2010

BBQ on Father's Day???

I've been pretty busy over the past week, hence no new posts....sorry! Please don't fret, this weekend is Father's Day and I plan to do a lot of preparing and cooking for the BBQ my parents are having in honor of the fathers.
Here's a sneak peek of some of the menu:
-Spinach Artichoke Chicken Burgers served on a potato bun with caramelized onions and roasted red pepper aioli
-Greek Style Quinoa Salad (I'll be sure to take a picture of it this time!)
-and some other stuff that I may or may not post
I might even bring some compost cookies for dessert since I have a whole bag of dough balls in my freezer that I shouldn't be eating.
Look out for the burger recipe and maybe a few others! Happy Father's Day!

Monday, May 3, 2010

Chicken Tikka Masala

Lately, I have been craving a good chicken tikka masala, however I never fulfill my craving because I don't know where to get good Indian food. I know, I know, I live in NYC where there are more Indian joints than I know what to do with, but the question is, are they good? I have no idea, so I don't attempt to order or visit any of them in fear of being disappointed or sick (haha). By the way I am no Indian food connoisseur, I have only had Indian a handful of times, and all time it has been Chicken Tikka Masala. I know you're thinking that I'm a real risk taker....sorry. I like what I like and I continue to eat what I like. Let me just say that Trader Joe's makes a good frozen dinner of Chicken Tikka Masala with Basmati Rice for those of you who frequent the frozen dinner aisle.
Anyways, a few weeks ago I had some good Tikka Masala with some friends up in Rockland County and since then I've been craving this yummy fulfilling chicken dinner! Instead of risking it at any of the restaurants around where I live, I decided I'd go ahead and make it for dinner last night! I found this recipe onThe Pioneer Woman Cooks, a blog I follow.
A few notes regarding the recipe:
1) I followed the recipe exactly with some additions. (I sprinkled salt to the chicken before coating in yogurt. And I did not add cayenne pepper for heat, instead added more serrano chile peppers, 2 to be exact.
2) I wasn't quit sure about broiling the chicken like they say to do, but I am glad to announce that this is a great way to make chicken if you want a bbq taste. I did 10 minutes on each side and the chicken came out amazing on its own!
3) The recipe makes A LOT of tikka, I didn't even know what to do with it all. I ate some for dinner and saved some for lunch the next day but still ended up with so much sauce! I ended up giving it to my parents and brother to eat for lunch at the office today. I wonder how they'll like it...
Here are some pictures that document my journey to fulfilling my Chicken Tikka Masala craving...

Friday, April 9, 2010

And the winning marinade is....

Well, there's no winner actually...the past two dinners I had Thursday and tonight, Korean steak and piri piri chicken, are both rated very highly on my yummy meter! I did learn a few things however.

First of all, when cooking with sugary marinades, such as the Korean Marinade My Way, I do not recommend using your grill pan, I'd stick to using a real BBQ. I basically ruined my grill pan, but I guess after having it for 7 years, it's probably time to buy a new one anyways, right??

Second, I'd make both marinades more spicy!! I like spice and once the proteins were cooked I didn't really taste the spice as much as I did when I tasted the marinades pre-cooking.

Thirdly, I highly recommend marinading for at least 1 day before cooking! Especially for the steak!

Fourth, I sliced up the shell steak that was cooked along with the spare ribs in the Korean marinade, and it made a great protein topper for a spinach arugula salad with grape tomatoes and leftover potatoes (recipe to come Monday).

Here's what the dinners looked like: Sorry, I forgot to take a photo of the salad!

Thursday, April 8, 2010

Marinades

I'm sorry I've been a little MIA the past week or so, between Passover and traveling and trying to get back into the swing of things I'm a little lost. I know some of you are probably sick of seeing that Matzoh Cake staring at you every time you open up Feed Your Sister but today I have some nice marinade recipes to share with you!
Since I'd been traveling I took this afternoon to refill the fridge/freezer and bought some chicken legs and breasts and some beef spare ribs and shell steaks. A long time ago I saw Danny Boome's show, Rescue Chef, make this amazing sounding chicken marinade. I adjusted the recipe a tad.
Spicy Piri Piri Sauce
  • 1 lemon, zested and juiced
  • 4 garlic cloves, peeled
  • 1 red peppers, seeded and roughly chopped
  • 2-3 chili peppers like Fresno or serrano (depends on how spicy you want it!)
  • 1 cup fresh parsley leaves
  • 1 tablespoon paprika
  • 3 tablespoons red wine vinegar
  • 1/2 cup olive oil
  • Salt and freshly ground black pepper
  • (This made enough to marinade 5 chicken legs, 5 chicken breasts, and 1 shell steak)

In a food processor add lemon zest, lemon juice, garlic, red pepper, chiles, parsley, paprika, red wine vinegar and oil. Process until it becomes a paste. Season with salt and pepper. Divide meat into resealable plastic bags. Pour marinade into bags and seal. Turn the meat around in the bags to distribute the marinade. Place meat in the refrigerator and let it marinate for at least 1 hour and up to 1 day. Preheat grill to medium-high heat. Remove meat from bags with tongs and drain well. Place on grill or grill pan, skin side down first, and grill for about 15 minutes on each side turning occasionally until cooked through. (You might need to do it in batches if grill is not big enough.)

The other recipe I made was based upon Korean steak sauce. It's usually sweet and contains soy sauce and brown sugar. I made my own spicy version of a Korean marinade. Here's the recipe!

Korean Marinade My Way

1 cup soy sauce

1 cup brown sugar, packed

1/4 cup mirin (rice wine)

1/2 cup water

1 small onion roughly chopped

2 tablespoons Sriracha sauce

2 tablespoons sesame oil

1/4 teaspoon black pepper

Combine all ingredients in a blender and puree. Pour marinade onto steak or chicken and let sit in the fridge for at least 3 hours, but preferably overnight. Grill meat on the BBQ or grill pan until cooked to your desired taste. Enjoy!!

Tuesday, March 16, 2010

Burrito Bites

All you need is wonton wrappers and the ingredients from my Laughing Planet Burritos. Mix all the ingredients together in a bowl, make sure they are not warm. Next spoon filling into the center of each wonton wrapper. Make a triangle shape and seal the sides using water. This process takes some time, but the end result is worth it! These Burrito Bites would be great for a finger food party or even a snack for children!

To cook the Burrito Bites I first sprayed a pan with olive oil or non stick spray. Then place about 6-8 wontons in the pan and let cook on one side for a minute of two. Flip the wontons to the other side. Now take some water and pour a little in the pan to steam the wontons. Be sure to cover the pan so you don't get splattered with hot water and oil!!! After about 3 minutes the wontons are done. Enjoy them with some of your favorite salsa!

Monday, March 15, 2010

Laughing Planet Style Burritos

I went to college at Indiana University of Bloomington. During my years in Bloomington I discovered one of the best burrito restaurants I ever ate. I don't think I even ate burritos before this time. Everything was organic and freshly made to order. The restaurant is called the Laughing Planet Cafe. I would eat there at least twice a week. What I loved about the burrito was that it had brown rice rather than spanish rice inside. I don't like spanish rice in my burritos. When I graduated from IU, I was very sad to leave Laughing Planet burritos behind, but luckily I got to go back for homecoming the following year!
When I did come back the year after graduating I told my friends that I was going to find a way to bring some burritos back to NYC. There was no way that I would leave Bloomington without a burrito or 2 or 10! I actually did bring back 10 burritos. I carried them in a lunch box and even got stopped at airport security with them. They asked me to see what was inside and I have to say I was pretty embarrassed. One of my friends does have a picture of this day, however, I need to get it scanned to my computer. (If any of you have it, please send it my way!)
So the burritos and I got back to NYC safely and from that day on for lunch or dinner I ate one of the burritos. They were delicious still! Last year I had the chance to go back to Bloomington once more for my friend's bachelorette party and of course we had a meal at Laughing Planet. I got the black bean and spinach burrito! Ohhhhh did I miss it!
There just isn't a place in NYC that is like Laughing Planet, at least none that I have found. I like to be able to hold my burritos without my hands getting dirty, like brown rice and fresh ingredients in them too! I used to like Burritoville that was the closest I ever got but then the one on the upper east side closed down! If you know of any good burritos in NYC please leave me a comment. Until then I will be eating my own version, that comes pretty darn close to Laughing Planet. The calorie count for my burrito was a total of about 515 calories and 22 grams of protein! That's a great lunch or dinner option! Here's my version...
The Ingredients: 1/2 cup brown rice, 1/4 cup mexican cheese blend, 1/4 of an avocado, 1 wheat wrap, sauteed spinach with Pam Spray, 1/2 cup black beans, and salsa (as much as you like)
All the ingredients for the filling was already warm when placed in the wrap (spinach, beans, and rice). The burrito after I folded it like a fool. The problem was that my wrap was to small and my fillings were too much for the wrap I used. It didn't really matter though because I was careful when I flipped it in the pan, so nothing came out. See photo. The key is to keep it together in the pan to get crunchy, if you can succeed doing that then you will be golden!
After both sides were crunchy and the filling was warmed through I wrapped the whole burrito with aluminum foil. I tried to get it nice and tight in the foil so that it wouldn't fall apart as I ate it.
I have to say that usually I'd want a side of guacamole to eat it with, but putting the avocado inside the burrito saved me a step and actually tasted wonderful! I liked how it got all warm and mushy, avocado in each bite!

Sunday, February 28, 2010

Chicken Pot Pie

So it seems as though everywhere I turn I am hearing about Chicken Pot Pie. It's been all over the Food Network. Ina's making lobster pot pie, Big Daddy's making Pot Pie Soup, The Neely's are doing it too, even my friend Hilary's mom has been making it....what's all the hype???? So I decided to see for myself what this dish is all about. My version is kosher and made with a puff pastry top. This is going to be my first time making the dish as well as eating it! I'll let you know how it goes...So here's my recipe, Enjoy!


Elia's Version of Chicken Pot Pie (makes five 10 oz ramekins)

2 breasts cooked chicken cut into bite-size pieces (I got help from the store and bought rotisserie chicken)
1 cup frozen peas and carrots
1 cup shelled edamame
2 stalks of celery cut thinly
1 large onion roughly chopped
6 tablespoons olive oil
5 tablespoons flour
1 cup roasted and fully cooked potatoes cut into bite-size pieces (I am using fingerling potatoes, but any will do)
2 cups chicken stock and 2 bouillon cubes
2 teaspoons chopped rosemary (for sprinkling on top of pastry)
kosher salt and pepper to taste
1 egg mixed with splash of water (egg wash)
1 sheet thawed frozen puff pastry (I used Pepperidge Farm, it's Pareve!)


1. Roast the potatoes on baking sheet with 3 tablespoons olive oil and salt and pepper.
2. Saute the onions and celery in 3 tablespoons olive oil in a large non-stick skillet until translucent, about 5 minutes. Add salt and pepper to taste.
3. Add the flour to the pan and stir constantly for about 2 minutes.
3. Slowly add the chicken stock and stir well until thick.
4. At this point stir in the cooked potatoes, peas, edamame, carrots, rosemary, and chicken. Turn off the heat and stir until all components are mixed evenly.
5. Spoon the mixture into ramekins.
6. Measure a circle 1/2 inch larger than the ramekin of puff pastry for the cover. With a pastry brush, brush the egg wash along the rim and sides of the ramekins. Place the puff pastry round on top of the ramekin and pinch to sides. Brush with egg wash and cut a slit into the pastry. Sprinkle with kosher salt and rosemary.
7. Place ramekins on cookie sheet and bake at 350 degrees for about 40 minutes until pastry is golden brown. Let stand for about 5 minutes.
9. ENJOY!!!!


Here's my friend Stacey enjoying my pot pie. Nothing says comfort more than chicken pot pie after a long day of work! I think she liked it....


Related Posts Plugin for WordPress, Blogger...